How to Use Charles Proxy
Last Updated: March 30, 2023
If you’re looking for a way to debug and monitor your website, Charles Proxy is the way to go. It’s a great tool that can help you troubleshoot problems and optimise your website for better performance.
This article will show you how to use Charles Proxy and explain how it works. So let’s get started!
What Is a Proxy?
A website proxy is a server that acts as an intermediary between your computer and the internet. When you connect to the internet, your computer will first connect to the proxy server, and afterwards, it will request the desired website.
The proxy server will then fetch the website and return it to your computer. This process allows you to bypass restrictions and censorship and improve your privacy and security online.
To better understand what a proxy is, check our article explaining proxy servers and how to use them.
What Is Charles Proxy?
Charles Proxy is a web debugging proxy server that enables you to monitor your website traffic. You can use Charles Proxy to throttle your bandwidth, simulate slow connections, and test how your website performs under different conditions. The platform was developed by Karl von Randow, and its official release was 20 years ago. It is written in Java, offering a plethora of useful features.
A debugging proxy can capture requests and responses to identify bugs by inspecting your HTTP(S) network traffic. Moreover, it allows you to narrow in on the root cause and present the fix.
Charles proxy is a reverse proxy. A reverse proxy is a type of proxy server that directs traffic from the internet to your internal network. It intercepts all client requests and forwards them to the appropriate server.
Reverse proxies are often used to improve the security, performance, and reliability of web servers. Click here to learn more about reverse proxies, their common uses and benefits.
Charles Proxy Features
- XML, JSON, SOAP interpretation
- SSL debugging
- Network message analysis
- HTML, CSS, JavaScript viewers
- Flash development aids
- Bandwidth throttling
- Remote file debugging
- Debugging HTTP connections from mobile devices
- Validation function
- Debugging aids
One major benefit of using Charles proxy is its compatibility with most operating systems.
Installing Charles Proxy
You can download the Charles proxy from its official website. You will notice several download links, each for a different OS. Depending on the device you’re using, choose the appropriate download link. The download will start instantly.
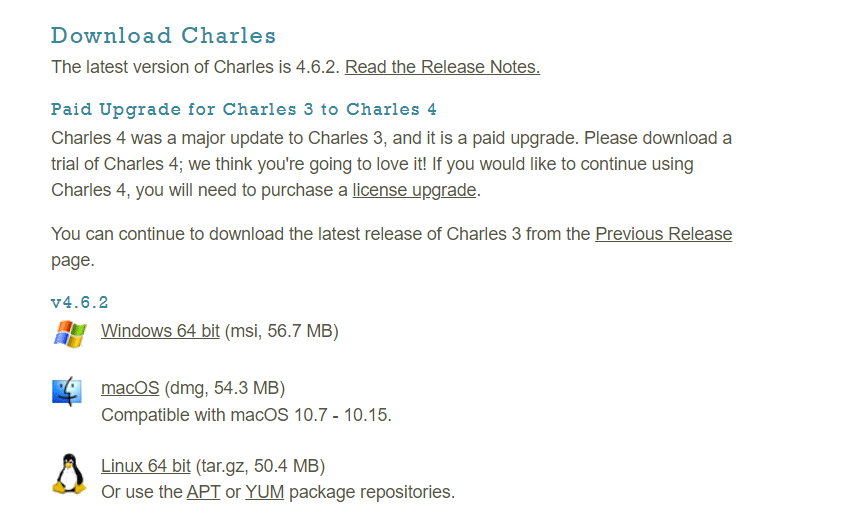
For Windows users, the setup wizard will install Charles as soon as you accept the terms in the Licence Agreement. If you are using macOS, double-click on the download file to unzip it and copy the Charles application into your Applications folder.
If you have Debian-based or Red Hat-based Linux distributions, Charles has APT and YUM repositories, which are the preferred ways to install Charles. Otherwise, you should unzip the tar.gz archive in an appropriate location.
Configuration
Charles automatically configures Windows’ proxy settings, allowing Internet Explorer and other Windows apps to start using it. By default, Charles configures and reconfigures the Windows proxy setting whenever it’s started or quit.
Charles also automatically configures the macOS system proxy settings and lets Safari and other apps use it automatically.
Upon installing Charles, you’ll be asked to allow it to auto-configure the proxy settings. However, if you want to change the proxy configuration behaviour at any given time, you can do so in the Proxy Menu > Proxy Settings dialogue.
iOS
Charles can be used on your iPhone as your HTTP proxy. Still, you have to manually configure the HTTP Proxy settings on your WiFi network in your iPhone’s Settings. To do it, follow these steps:
1. On your iOS device, open Settings.
2. Tap on WiFi and select the network you’re connected to. A new window will appear.
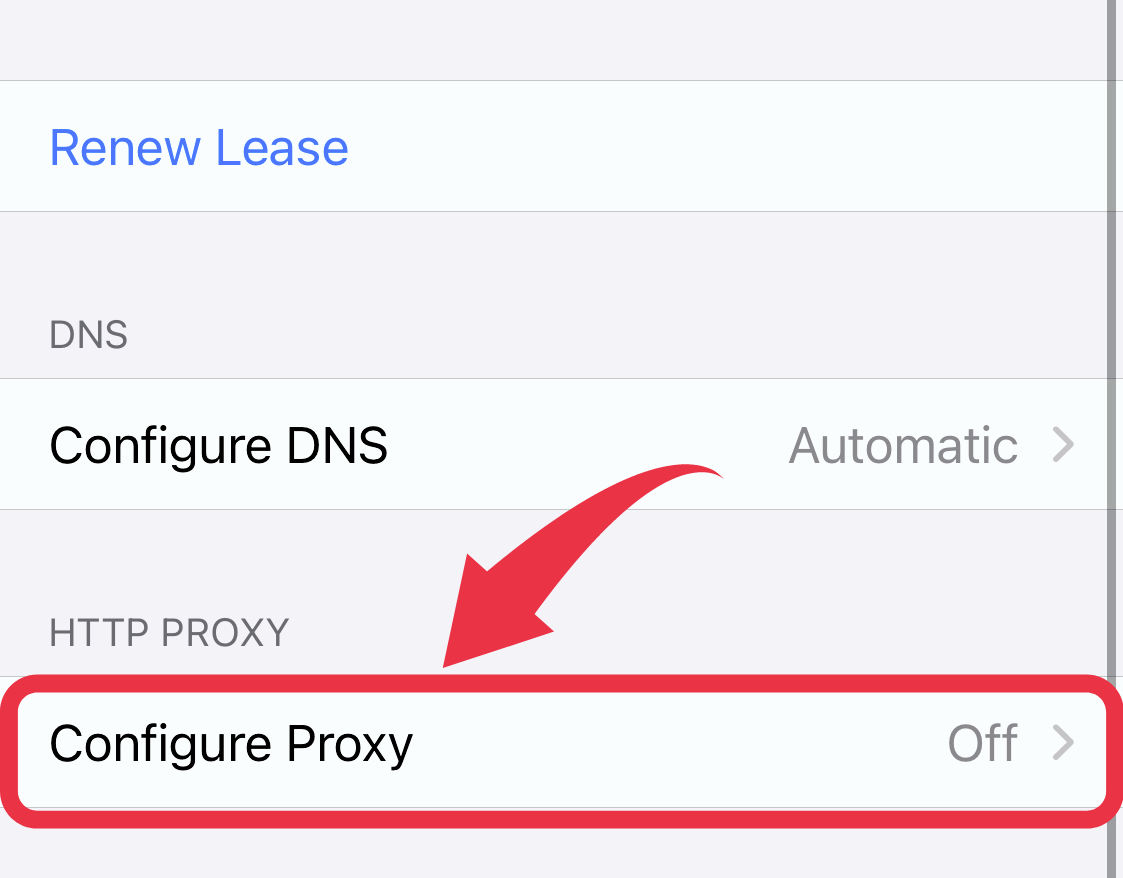
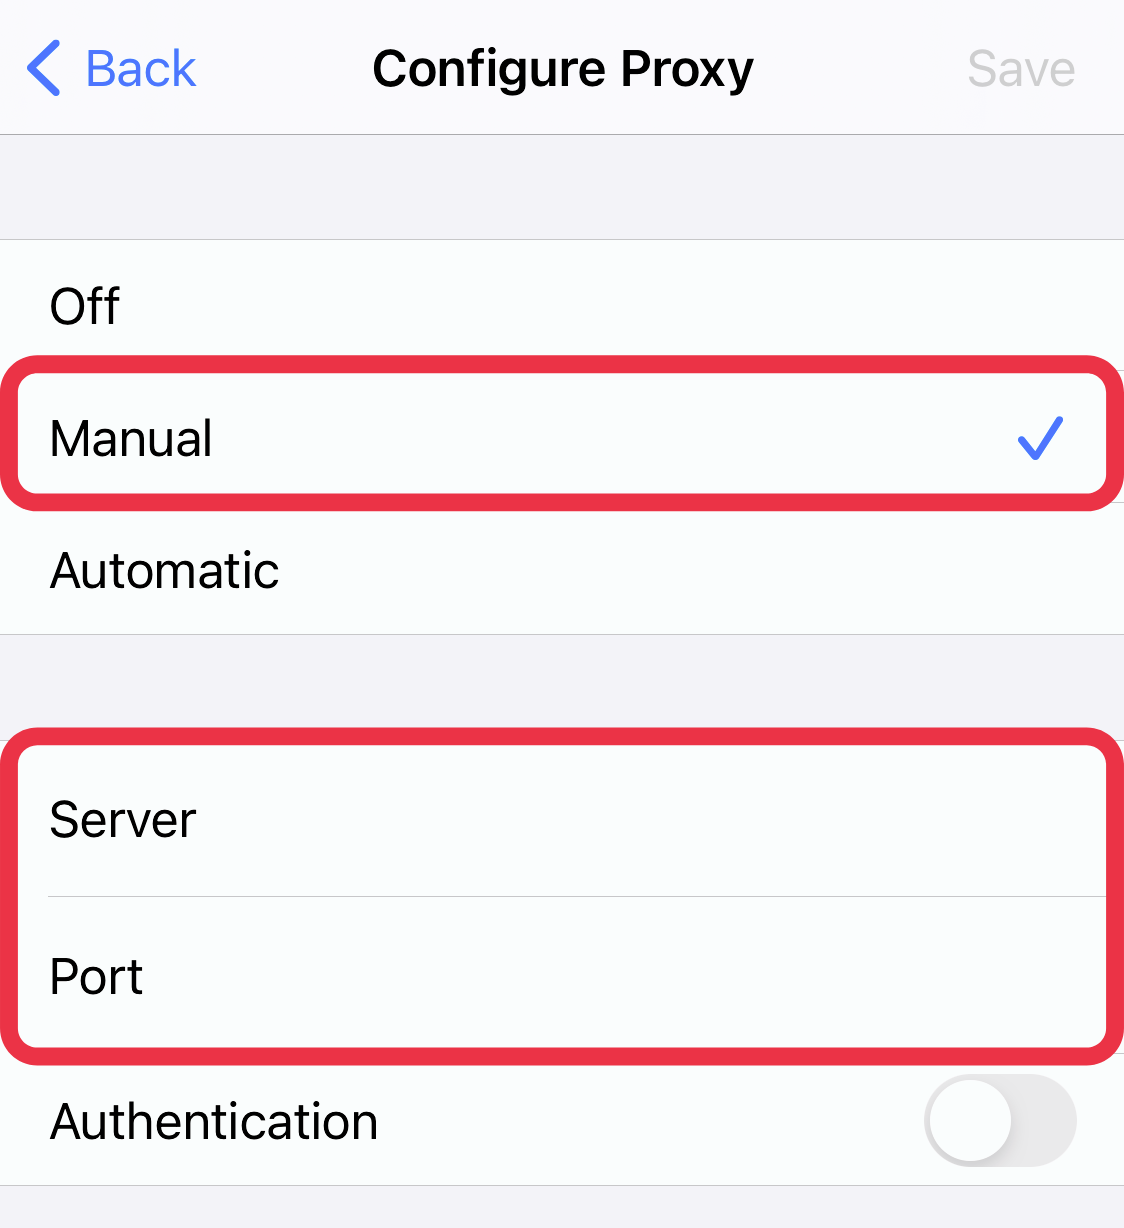
3. Scroll down and click on Configure Proxy and select Manual.
4. In the Server field, fill in the IP address of your computer running Charles. The Port field is the port Charles is running on, which is usually 8888. Authentication should stay off.
The first time you connect your iPhone, you will see a prompt in Charles asking you to allow the traffic. Once you allow it, all your iPhone web traffic will be sent via Charles. When you stop using Charles, don’t forget to disable the HTTP Proxy in your Settings. If you don’t, you’ll get confusing network failures in your apps.
Android
Android users can configure Charles similarly to iOS users. If you use Android, take the following steps:
1. Tap on WiFi in your device’s Settings and hold the name of the connected network.
2. From the pop-up menu, select Modify network.
3. Check the box next to Advanced options and hit Save.
4. Change the Proxy from None to Manual.
5. Finally, enter the IP address of your computer running Charles under Proxy hostname and enter Charles’ port number under Proxy port.
Getting Started
Once you have Charles installed and configured, it’s time to start using it. So, let’s go over some Charles proxy basics.
Sessions
A new session is automatically created when you start Charles. A Session contains all your recorded information, and you will most likely need a single session while using Charles.
When your Session gets too busy or full, you can clear it using the trash can icon on the toolbar or the Clear Session option in the File Menu.
You can save and reopen your sessions through the File Menu.
Recording
Charles’ primary function is recording. Therefore, you can find the requests and responses recorded in your current Session available for inspecting and analysing.
The requests recorded in a Session will depend on your Charles configuration. Usually, they include all HTTP and HTTPS traffic from your browser, plus other apps on your device. However, data from generic socket connections such as through the SOCKS proxy or Port Forwarding may also be included.
If you have the recording turned off, Charles will pass through all of the requests as usual, but they won’t be recorded in the Session.
Requests and Responses
The basic elements recorded in Charles are a request and its response. To clarify, HTTP/HTTPS consists of request-response pairs — the request from your device to the server and the server’s response.
You can find the recorded requests in the Session window, and you can view them in two different ways — structure view and sequence view.
The Structure view organises the requests in a tree form by the hostname and then separates the folders/directories within the host. The Sequence view, on the other hand, organises the requests in the sequence they occur.
To see the additional options, right-click a request in the navigator view. You can copy or save the request and response bodies or save multiple requests at once.
Charles SSL Certificates
Charles generates its own certificates for sites and signs them using a Charles Root Certificate.
The Charles Root Certificate is uniquely generated for your Charles installation. However, a warning will pop up once your browser or app receives the certificate because it’s not on your list of trusted root certificates.
You can opt to permanently trust each site’s certificate as you come across it, in which case you won’t need to trust the Charles Root Certificate.
Proxying
As previously mentioned, Charles Proxy is used as a man-in-the-middle for web traffic. That means it can intercept, inspect, and modify all data going through it.
Proxying requests and responses allows Charles to inspect and change requests as they pass from the client to the server and the responses as it travels from the server to the client.
Breakpoints
Breakpoints allow you to intercept requests and responses and make changes before sending or receiving them. This is useful if you want to test how a server or app will respond to a different input.
The Breakpoints window will automatically open in Charles once a request or response trips. The window comprises all requests and responses currently intercepted and waiting for your action.
You can select the request/response you want to view and edit its contents. Furthermore, you can decide whether to Execute, Abort, or Cancel the breakpoint. Execute will apply any changes you’ve made, Abort will block the request/response and send an error message to the client, and Cancel will discard any changes you’ve made.
Throttling
Throttling is the process of slowing down or delaying requests so you can test how your app or server will respond when the internet connection is poor. Charles can help adjust the bandwidth and latency of your Internet connection, allowing you to simulate modem conditions using a high-speed connection.
Reverse Proxy
You can benefit from using a reverse proxy if your client application doesn’t support the use of an HTTP proxy, or you just want to avoid configuring it to use a proxy. The reverse proxy is transparent to the client application and allows you to view the traffic in Charles where you previously may not have been able to.
You can also use Charles to create a reverse proxy to an HTTP or HTTPS destination. The destination port for HTTP will likely be 80, and for HTTPS — 443. When creating an HTTPS reverse proxy, you must connect to it using HTTPS.
SSL Proxying
By becoming a man-in-the-middle, Charles lets you view the communication between the web browser and the SSL web server in plain text.
Charles will generate a certificate for the server and sign it with its own root certificate, preventing your browser from seeing the server’s certificate. In other words, Charles will receive the server’s certificate, while your browser will receive the Charles Proxy certificate.
Note that you will see a warning indicating that the root authority isn’t trusted. You’ll stop seeing warnings by adding Charles CA Certificate to your trusted certificates.
You have to identify the hostnames you want to enable SSL proxying on. The list can be found in the Proxy Settings, SSL tab. Another way to go about it is to right-click on a hostname in the structure (tree) view and turn on SSL Proxying. You can turn the SSL proxying on and off under Proxy Preferences.
Note: You may need to restart Charles after adding a hostname for the existing browser sessions to change.
Port Forwarding
Port forwarding is the process of intercepting traffic headed for a specific port on your server and sending it to a different (usually local) port. Once you’ve set up port forwarding, all traffic going to that port will be forwarded to the new one you specified.
Port forwarding can come in handy when troubleshooting your network. Specifically, you can use it to see if your ISP is blocking certain ports, such as HTTP port 80 and SMTP port 25.
Using the Port Forwarding tool, any TCP/IP or UDP port can be configured to be forwarded from Charles to a remote host, which will enable debugging of any protocol in Charles.
Wrap Up
Charles proxy is a powerful web debugging tool packed with features. Using it correctly can save you time and effort, and it will help you locate and fix malfunctions in no time.
You can use Charles on your PC and your mobile device, both iOS and Android.
Getting familiar with Charles’ basic functions, such as recording requests and responses, is the first step toward successful proxying.
Hopefully, this article gave you a better understanding of how to use Charles Proxy and the basics behind this debugging tool. Now’s the time to install it and give it a shot!
FAQ
Charles is a Java-based application used for monitoring network traffic. It can also be used to debug web applications or test the performance of different internet connections.
Charles Proxy tool works by intercepting traffic between the web browser and web server. Since you are unable to view what is transmitted and received between your web browser/client and the server, it might be tough to pinpoint what is wrong in case of a malfunction. Charles is here to help you see what is happening, so you can quickly diagnose and fix the issues.
Go to Privacy and Security in Chrome and click on Manage certificates. Here, simply import your Charles Root Certificate. From now on, Chrome will always trust certificates signed by Charles.
ABOUT AUTHOR

![How to Sell on Depop in the UK [2024 Guide]](https://cybercrew.uk/wp-content/uploads/2023/06/Selling-on-Depop-UK.png)

![Free Appointment Scheduling Software — UK Top Picks [2024]](https://cybercrew.uk/wp-content/uploads/2022/07/Free-Appointment-Scheduling-Software.png)